Guys if you too keep writing long articles in your blog or website. And make a lot of points in that article, which can help the readers, but with so many points, the article becomes very long and the point readers do not understand which point is written where. To explain the points to the readers correctly, you have to use the Table of Contents (ToC), with the help of this, it becomes very easy for the users to search those points inside that article.
What is Table of Contents (ToC) ?
In a way, this Table of Contents is a "jump link" for an article. This table of contents will make it easier for users to jump to the part of the article they want to read. So when a user click on the link of the Table of Contents, the user will immediately be able to read the part they clicked on.
If you've ever read an article on Wikipedia, of course you've seen Table of Contents, which makes it easy for you to go to a particular article section. That's about Table of Contents.
How To Add Table of Contents (ToC) In Blogger Post
- Login to your blogger blog Dashboard.
- Then go to Theme > > Edit HTML.
- Click anywhere inside the code area and press Ctrl + F keys to open the search box.
- Now, Search for </head> tag and paste below code just above of this tag.
<link href='http://fortawesome.github.io/Font-Awesome/assets/font-awesome/css/font-awesome.css' rel='stylesheet'/><link href='//fonts.googleapis.com/css?family=Oswald' rel='stylesheet' type='text/css'/><script type='text/javascript'>//<![CDATA[ // function TGGCode() {var TGGCode=i=headlength=gethead=0; headlength = document.getElementById("Code-TGG").getElementsByTagName("h2").length;for (i = 0; i < headlength; i++) {gethead = document.getElementById("Code-TGG").getElementsByTagName("h2")[i].textContent;document.getElementById("Code-TGG").getElementsByTagName("h2")[i].setAttribute("id", "point"+i);TGGCode = "<li><a href='#point"+i+"'>"+gethead+"</a></li>";document.getElementById("TGGCode").innerHTML += TGGCode;}}function mbtToggle() {var mbt = document.getElementById('TGGCode');if (mbt .style.display === 'none') {mbt .style.display = 'block';} else {mbt .style.display = 'none';}}//]]></script>
- Now, Search for ]]></b:skin> tag and paste below code just above of this tag.
.TGGCode{border:5px solid #f7f0b8;box-shadow:1px 1px 0 #EDE396;background-color:#FFFFE0;color:#707037;line-height:1.4em;margin:30px auto;padding:20px 30px 20px 10px; font-family:oswald, arial;display: block;width: 70%;}.TGGCode ol,.TGGCode ul {margin:0;padding:0;} .TGGCode ul {list-style:none;}.TGGCode ol li,.TGGCode ul li {padding:15px 0 0; margin:0 0 0 30px;font-size:15px;}.TGGCode a{color:#0080ff;text-decoration:none;}.TGGCode a:hover{text-decoration:underline; }.TGGCode button{background:#FFFFE0; font-family:oswald, arial; font-size:20px;position:relative; outline:none;cursor:pointer; border:none; color:#707037;padding:0 0 0 15px;}.TGGCode button:after{content: "\f0dc"; font-family:FontAwesome; position:relative; left:10px; font-size:20px;}- Now, Search for <data:post.body/> tag and replace it with the below code.
Note :- If you see this code one or more times, then it is necessary to replace all.
<div id="Code-TGG"><data:post.body/></div>
- Click Save Theme.
- Open Blogger Dashboard And Open The Post In Which You Want To Add Table.
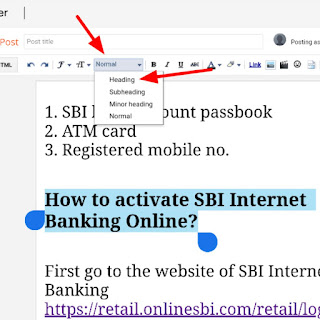
- First of all activate the heading of all the mean lines in your post.
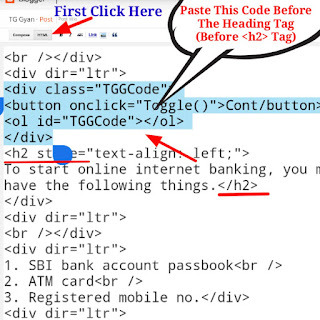
- Now Go To HTML.
- Now first of all you find here First heading title Paste this following code just above it.
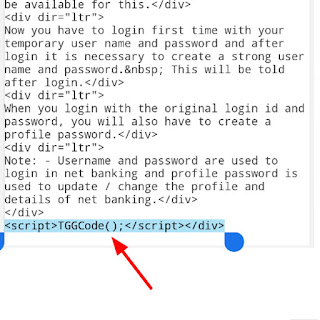
- Now go to the end of the post and paste the code below.
- before publish your post see a preview of your blog post.
- If preview is correct then simply publish it.


